Time Columns
The Time Columns Tab controls what Time Column options you would like to display in various sections of the Timesheet.
Time Columns Tab
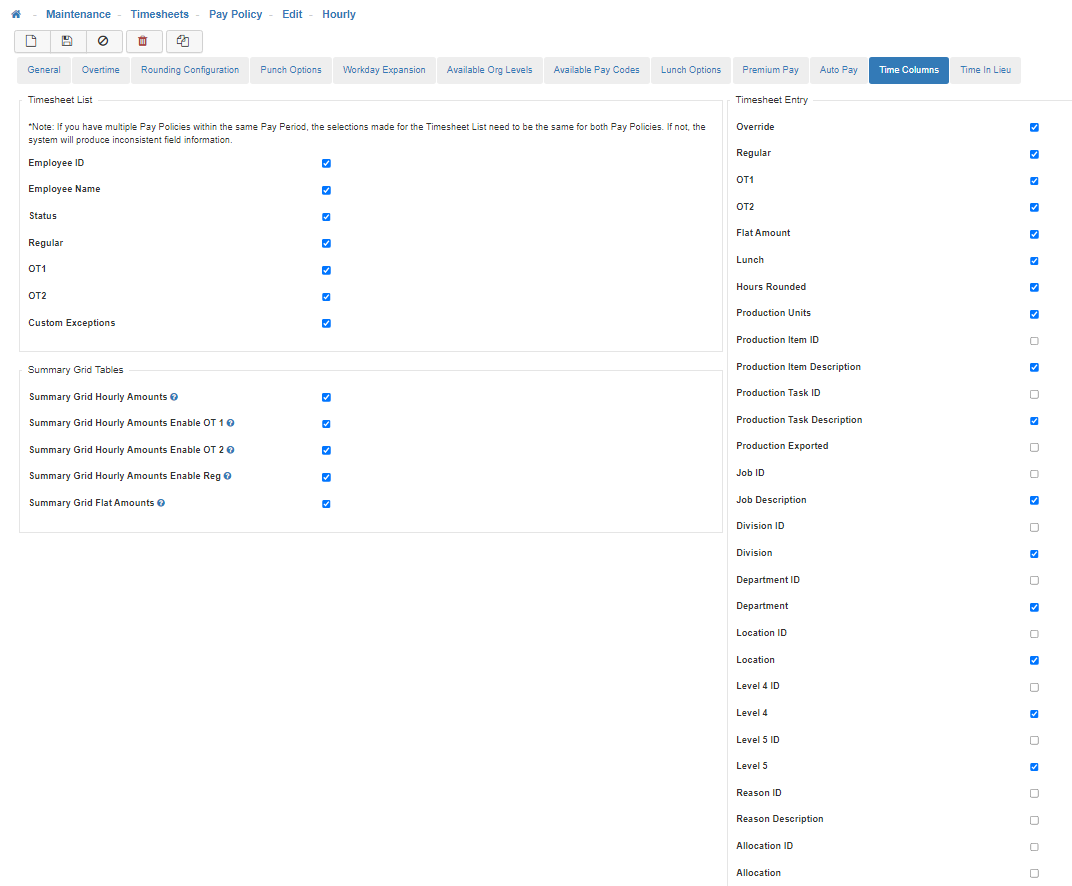
-
Timesheet List
This determines what information shows on the Timesheet List screen. When creating a new Pay Policy, the Employee Name, Status, Regular, OT1, and Custom Exceptions fields, located in the Timesheet List section, automatically default to enabled. All other fields within this section would need to be manually enabled, by selecting the checkbox, if you would like them to display on the Timesheets.
Note: If you have multiple Pay Policies within the same Pay Period, the selections made for the Timesheet List need to be the same for both Pay Policies. If not, the system will produce inconsistent field information.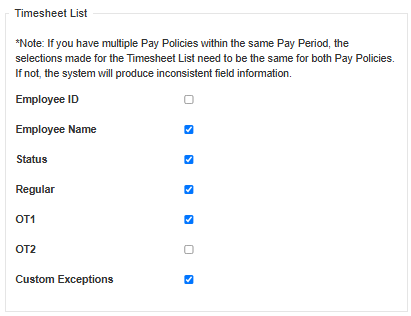
-
Employee ID
When enabled, this will display the Employee ID for each opened Timesheets on the Timesheet List screen. -
Employee Name
When enabled, this will display the Employee Name for each opened Timesheets on the Timesheet List screen. -
Status
When enabled, this will display the Timesheet Status for each opened Timesheets on the Timesheet List screen. -
Regular
When enabled, this will display the Total Regular Hours for each opened Timesheets on the Timesheet List screen. -
OT1
When enabled, this will display the Total OT 1 hours for each opened Timesheets on the Timesheet List screen. -
OT2
When enabled, this will display the Total OT 2 hours for each opened Timesheets on the Timesheet List screen. -
Custom Exceptions
When enabled, this will display any Custom Exceptions for each opened Timesheets on the Timesheet List screen.
-
-
Summary Grid Tables
The Summary Grid is located at the bottom of a Timesheet to give a quick overview of the User's Timesheet which provides two table options; 'Hourly Amounts' which will give a breakdown by hours, and 'Flat Amounts' which provides information when paid a Flat Amount per unit of completion. When creating a new Pay Policy, the Summary Grid Hourly Amounts, Summary Grid Hourly Amounts Enable OT1, and Summary Grid Hourly Amounts Enable Reg fields, located in the Summary Grid Tables section, automatically default to enabled. All other fields within this section would need to be manually enabled, by selecting the checkbox, if you would like them to display on the Timesheets.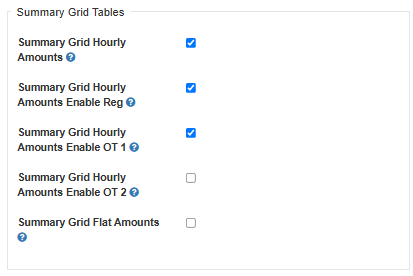
-
Summary Grid Hourly Amount
When enabled, this will provide access to the 'Hourly Amounts' table in both LightWork and the Kiosk. -
Summary Grid Hourly Amounts Enable OT 1
When enabled, this will provide access to the 'OT 1' column in the Hourly Amounts table in both LightWork and the Kiosk. -
Summary Grid Hourly Amounts Enable OT 2
When enabled, this will provide access to the 'OT 2' column in the Hourly Amounts table in both LightWork and the Kiosk. -
Summary Grid Hourly Amounts Enable Reg
When enabled, this will provide access to the 'Reg Hrs' column in the Hourly Amounts table in both LightWork and the Kiosk. -
Summary Grid Flat Amount
When enabled, this will provide access to the 'Flat Amounts' table in both LightWork and the Kiosk.
-
-
Timesheet Entry
Determines what information shows on the Timesheet for each Timesheet Line. When creating a new Pay Policy, the Regular, and OT1 fields, located in the Timesheet Entry section, automatically default to enabled. All other fields within this section would need to be manually enabled, by selecting the checkbox, if you would like them to display on the Timesheets.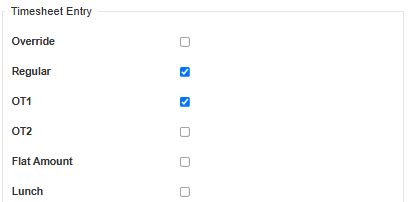
-
Override
When enabled, this provides access to the OVR column which when selected will allow manual overrides to the Regular, OT 1 and OT 2 hours when necessary. -
Regular
When enabled, this provides viewing access to the REG column, and modification access when Override is also enabled and selected. -
OT1
When enabled, this provides viewing access to the OT 1 column, and modification access when Override is also enabled and selected. -
OT2
When enabled, this provides viewing access to the OT 2 column, and modification access when Override is also enabled and selected. -
Flat Amount
When enabled, this provides viewing access to the Flat Amount column. -
Lunch
When enabled, this provides viewing access to the Lunch column. -
Hours Rounded
When enabled, this provides viewing access to the Hours Rounded column, if the Pay Policy is setup for Hour Rounding. -
Production Units
When enabled, this provides viewing access to the Production Units column. -
Production Item ID
When enabled, this provides viewing access to the Production Item ID column. -
Production Item Description
When enabled, this provides viewing access to the Production Item Description column. -
Production Task ID
When enabled, this provides viewing access to the Production Task ID column. -
Production Task Description
When enabled, this provides viewing access to the Production Task Description column. -
Production Exported
When enabled, this provides viewing access to the Production Exported column. -
Job ID
When enabled, this provides viewing access to the Job ID column. -
Job Description
When enabled, this provides viewing access to the Job Description column. -
Organization Level 1 ID
When enabled, this line will populate with the Organization Level's assigned name within your system. -
Organization Level 1
When enabled, this line will populate with the Organization Level's assigned name within your system. -
Organization Level 2 ID
When enabled, this line will populate with the Organization Level's assigned name within your system. -
Organization Level 2
When enabled, this line will populate with the Organization Level's assigned name within your system. -
Organization Level 3 ID
When enabled, this line will populate with the Organization Level's assigned name within your system. -
Organization Level 3
When enabled, this line will populate with the Organization Level's assigned name within your system. -
Organization Level 4 ID
When enabled, this line will populate with the Organization Level's assigned name within your system. -
Organization Level 4
When enabled, this line will populate with the Organization Level's assigned name within your system. -
Organization Level 5 ID
When enabled, this line will populate with the Organization Level's assigned name within your system. -
Organization Level 5
When enabled, this line will populate with the Organization Level's assigned name within your system. -
Reason ID
When enabled, this displays the Reason Code column within a selected Employee's Timesheet, where you can choose from a list of available Reason Codes.
Note: There may be more than one Pay Policy available in your system and the Hourly Pay Policy is just used as an example. If you wish to modify a different Pay Policy choose the appropriate Pay Policy from the list available within the Pay Policy Maintenace screen. -
Reason Description
When enabled, this displays the long Description column of the Reason Code selected within an Employee's Timesheet. -
Allocation ID
When enabled, this provides viewing access to the Allocation ID column. -
Allocation
When enabled, this provides viewing access to the Allocation ID column.
-
-
Save
Once you are satisfied with your selections, click on the 'Save' icon.